Karmann Coachbuilts

Website & Forum


How to TDI a Karmann Gipsy

by

Tudor Morgan


Introduction

This is a fairly detailed account of the sequence of events and work undertaken when I converted our Karmann Gipsy to a 90 bhp IZ TDI. It took approximately 2 months taking plenty of time, starting in mid July and finishing early September 2007.

I followed the tried and proven HA-Projekt method and using a lot of their conversions accessories, but I needed to modify and manufacture some of my own equipment which I considered to be an improvement because I have an engineering background. But for those who do not want to tackle any modifications, the equipment supplied is fine.

Anyone with a degree of technical knowledge could successfully perform this conversion. The wiring of the TDI tends to put most people off but you can obtain a complete system which is ready to fit the T3/T25 if you don’t want to make one up yourself.

I do not advocate the use of air cooled intercoolers as you cannot get the most effective ram air effect at the rear of the vehicle. You have to use the liquid cooled intercooler which is very efficient, fits neatly on the left hand side of the suspension, and has its own radiator and pump.

There are plenty of donor cars available that have been scrapped, with good TDI engines, Passats and Golfs 1995/96/97 models, which are normally 90 bhp IZ. If you are lucky enough to come across 110 bhp models with the red I they give a lot more power but need stronger gears and the ratios changing.

As well as the TDI engine you need to remove all of the engine wiring harness, connectors, brain or ECU, isolator box, chipped ignition keys (if available), ignition lock sensor ring, test port, hoses, clips.

Everything has to be meticulously cleaned and much time and patience needed. Now is the time to fit the new seals, timing belt etc when the engine is out.

The 90 bhp fitted to a Gipsy is a very good option and compliments the original gearbox. The only modification needed is the wider input shaft which is not a problem to change.

It was a thoroughly enjoyable and satisfying task, with the final outcome very worthwhile, transforming the Gipsy in terms of economy and performance.

I hope the following pictures and information will be of interest and invaluable to those considering this project. If you need further information or guidance I will be pleased to advise.

Tudor Morgan


For ease, the article has split into four sections.
  • The first section provides details of the parts that are required
  • The second section contains contains the work sequence
  • The third section contains over 100 photographs accompanied with text, showing how the upgrade can be performed.
  • The Fourth and final section has additional Information for converting a 90ps TDI to a 110ps TDI


Parts Required

  • Specially made wiring loom

  • Accelerator fly by wire extension cable and connectors

  • Two T3 blank keys and tops programmed to computer brain (or take keys from donor car and use chips)

  • HA intercooler and special angled silicone pipes No's HA0505

  • Silicone pipe connector collars HA0602/0603

  • Spigot shaft bearing for flywheel/crank

  • T3 oil pump (preference Febi Belstein)

  • Special engine mounting 90 Ps left hand side HA0502

  • T3 large crank shaft oil seal housing

  • T3 crank shaft oil seal - large and small

  • Set of engine back plates HA511

  • T3 exhaust to TDI turbo outlet adaptor HA part

  • Collar to inlet manifold air temp sensor HA0512

  • Oil crank case breather pipe assembly kit HA0514

  • Oil pipe kit for turbo HA0513

  • Water pump ribbed pulley VW part 028121031E

  • Ribbed alternator water pump belt

  • Gear box input shaft

  • Flywheel bolts

  • Crank shaft pulley centre bolt

  • Clutch assembly for TDI 90 ps

  • Thermostat 80 deg C

  • Timing belt (preferably Gates)

  • Timing belt tensioner

  • Battery isolator switch

  • Heavy duty inline fuses and holders

  • Assortment of resistors to set temp gauge 2 ohm – 14 amp

  • External cooler oil filter W1130/1

  • Adaption kit piping and oil cooler

Note – all parts available from HA-Projekt

Lengenbachweg 8 - 75328 Schömberg

Tel: 0 70 84 - 6192 - Fax: 0 70 84 - 5280


Sequence of work
  • Remove engine & gearbox
  • Discard throttle and cold start cables
  • Remove all existing engine bay wiring loom
  • Fit new HA wiring loom, bind, secure and support correctly, or make up own from donor car
  • Fabricate accelerator pedal, actuation mechanism for potentiometer, or use HA complete pedal kit
  • Run wiring from potentiometer to engine bay with correct connectors
  • Use existing TDI alternator with spring loaded tensioner. 90amp alternator has excellent output
  • Discard air con pump and bracket (unless you want air con)
  • Change water pump pulley for ribbed groove type
  • Measure size for new ribbed belt
  • Fit spigot shaft bearing for T3 TD into crank shaft end or machine up a phosphor bronze bush
  • Change fly wheel bolts
  • Fit new timing belt and tensioners
  • Change crank shaft pulley bolt
  • Set injector pump timing to 0.70mm
  • Change crank shaft large oil seal housing for that of T3 TD JX type (a better seal)
  • Renew small crank oil seal
  • Enlarge slightly the turbo waste gate rod end eye to prevent seizing
  • Change oil pump for that of original T3 TD, with the inclined pick up tube
  • Blank off original TDI turbo oil return at block (HA part)
  • Fit new oil return pipe (HA)
  • Remove and discard exhaust and inlet manifold recycling pipes and valve, fabricate appropriate steel blanking plates
  • Tap / clean threads in the block for the left hand engine mounting
  • Fit 80 deg c rated thermostat
  • Change thermostat housing for original T3
  • Fit modified engine crank case breather pipe (HA)
  • Break vacuum pump, only one take off point required
  • Blank off the cylinder head small water outlet by tapping it to 5mm and fitting sealed stainless steel bolt
  • Mark and stamp a new TDC mark on flywheel by measuring crank rotation and lining it up with mark on T3 bell housing (don’t forget to grind off old mark)
  • Fit new engine lazer cut stainless steel back plates (HA)
  • Fit the T3 JX TD sump before fitting the flywheel first, otherwise you cannot get at the sump bolts
  • Change and modify T3 original dipstick tube (note this engine now takes 5 litres of oil, mark dipstick accordingly)
  • Round off bracket fixing eye of power steering pump where hose passes to prevent chaffing
  • Fit exhaust adapter onto turbo outlet in order to retain original T3 TD exhaust system (HA)
  • Change gearbox input shaft to larger diameter (HA)
  • Ensure the air mass flow censor arrow faces the engine
  • Fabricate special angled connector to retain original JX air filter
  • Fabricate air filter mounting brackets to fix filter box behind left side of Gipsy bumper
  • Fit small collar that goes into inlet manifold (HA part no 0512)
  • Fit HA intercooler with brackets or U bolts, mount in the region of the left hand rear spring housing
  • Fit intercooler radiator in the front of vehicle, route respective pipe work to rear, fit or adapt bleed and filling mechanism
  • Fit external oil cooler, filter adapter, and appropriate piping (not essential but desirable)
  • Mount computer / ECU on the left hand side near the lights in the engine bay. The EGR connection is not used (but if read by the computer it will state fail but ignore it)
  • Connect waste gate relay (red, blue & black pipes)
  • Connect VAK pipe from turbo onto ECU. The cruise control is the blue & white connectors. Blue equals brake, white equals clutch. Note – these connectors must be bridged unless they are used for cruise control
  • Connect red wire constant live to battery
  • Fit heater plug fuse between the two reds at the black and grey relays (that supply the computer). The thin red wire at the computer relays should be left blank (insulate). You may need to remove black original wiring box and fit it onto the left hand side panel to allow turbo / intercooler pipes to pass the white round pin connector and the square white connector fit into the original T3 connectors which are situated in the engine compartment T3 black wiring box. The black wire on one of the connectors should be left blank – insulate.
  • Connect black connector to expansion tank water level indicator
  • The alternator connector has a single green wire for use with a T3 rev counter. Locate rev counter pulse on back of alternator and connect green, then correctly set adjusting screw on back of clock. The big brown and black connectors adjacent to the engine loom should be connected.
  • The immobiliser box should be fitted in the front near the fuse box.
  • Cut black plastic ring off T3 original ignition switch barrel and click computer pick up black collar into place. It will fit perfectly.
  • Cut console around ignition switch to allow for new pick up ring
  • Two keys to be provided, or original TDI chips from donor car. If not available chips will have to be programmed to brain and profiles cut to suit the existing T3 locks and new plastic key tops fitted (using blank keys).
  • Extend the plain grey cable to the front cab and join onto the immobiliser grey.
  • The immobiliser – brown to earth, the black cable to terminal 15 on the fuse box. It is better to take it off black feed to ignition switch as this can cause problems with initial starting (so it comes on with the key).
  • The white cable with the red tracer is to the test port which can be located in the glove box.
  • Immobiliser connections
    T6 - 1 is K1.15
    T6 - 2 is grey/white wire from ECU
    T6 – 2 goes to test port no 7
    T6 – 4 is earth
    T6 – 6 is earth
  • The throttle potentiometer needs an extra long length 4.5 mtr with appropriate connectors.
  • Fit and try various resistors in series on temperature gauge yellow/red feed wire until correct needle setting is obtained. A variable resistor is useful for this task.
  • File away part of the rib of the plastic engine cover as the alternator will foul at this point and cause annoying knocking noise.


The Pictorial Work Sequence


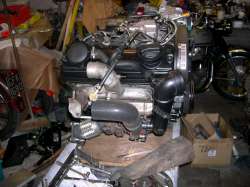
Click on the thumbnails for a bigger image
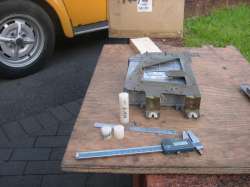
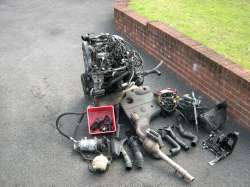
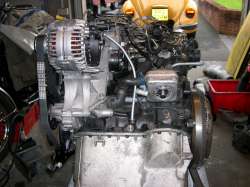
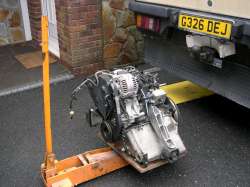
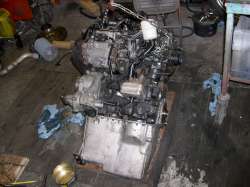
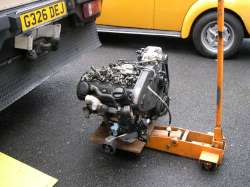
 

1. The Donor car a 1995 Passat 90 bhp 2. Take everything you can from the donor car

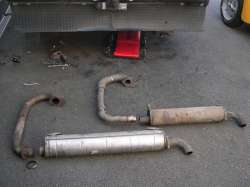
3. Remove your old JX unit
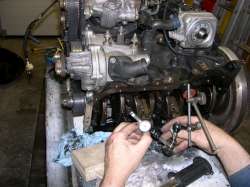
     

4. Finding TDC on TDI engine 5. New TDC mark made

6. Fit JX sump


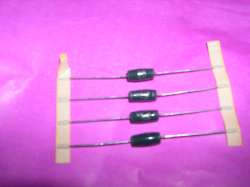
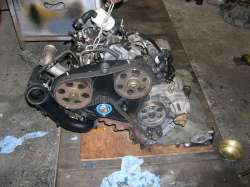
7. New Gates, belt and tensioners

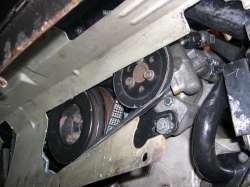
8. New alternator/water pump ribbed belt

9. Special angled silicone intercooler pipes


10. Handling frame made to give correct angle

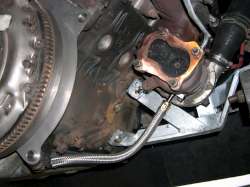
11. Turbo oil return and left hand mounting
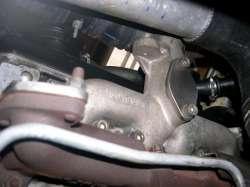
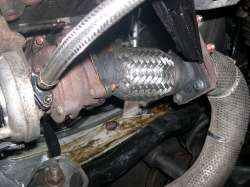
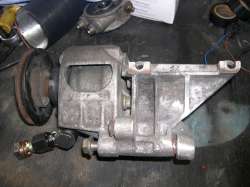
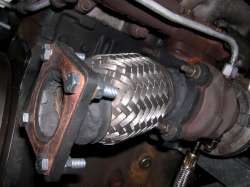
12. Exhaust adapter


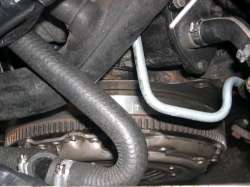
13. Remove and blank re-circulating pipes

14. Adaptor view

15. T3 support cross strut needed
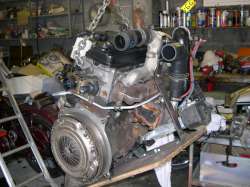
     

16. Use lighter T3 pipe and box RHS 17. Fitting new TDI lump

18. Another view


19. HA crank case breather 20. TDI steering pump adaptor and shaped eye

21. Steering pump in situ


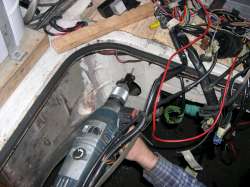
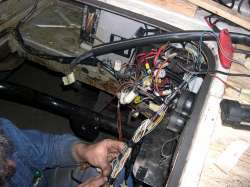
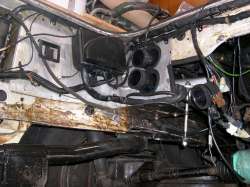
22. Accurately cutting intercooler pipe holes 23. Holes cut and much wiring to be sorted

24. Marking out air intake pipe hole
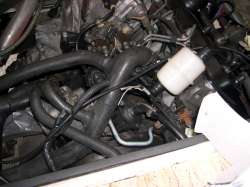
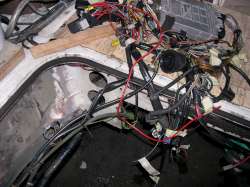
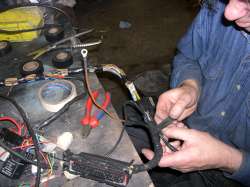
     

25. Intake pipe hole cut 26. Temporary taping of loom to form correct shape

27. More loom shaping


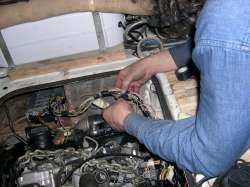
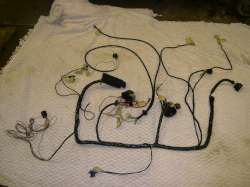
28. Binding loom with non sticky tape to allow flex 29. The finished loom correctly shaped for Gipsy

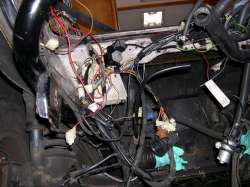
30. Black T3 box repositioned, loom fixed, intercooler pipes located
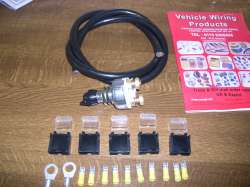
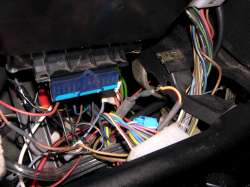
     

31. Sizing up wiring 32. Battery isolator, a must, and extra fusing

33. Resistor positioned in line to set temp gauge needle


34. Various resistors 2 – 14 ohms 35. Fabricated nylon ECU mountings, allows air flow

36. Nice position of ECU


Next Page-->


Or Select Page: 1 - 2 - 3 - 4


<--Click here to return to the Main Index